Monday, July 14, 2014

Access network share outside of domain from SSIS

I was trying to copy some files using SSIS to a share outside the domain, but it turned out this was not as simple as copying the files manually.

The first thing to do was to create a mapped drive using the "NET USE" command with a Execute process task:


I had to change the first 3 properties of the task:

  • RequireFullFileName: False
  • Executable: cmd.exe
  • Arguments: /c "NET USE Z: \\192.168.1.10\sqlbackup /USER:username password /p:NO"
The /p:NO at the end means that the mapping will not be persistent. This is optional.

Next step was to change the destination connections to use the new mapped drive:


Also set the DelayValidation to True for this, otherwise you will get an error because the drive has not been yet mapped.

In the end, the package would look like this:


In the last Execute process task I remove the drive with the command: /c "NET USE Z: /delete":


However, when I tried to run the package, I always got the following error message:
The specified network password is not correct.

I was not getting this error in the package execution error, but when I was trying to run the command manually.
I was running this on a Windows Server 2012, 2008 and 2008 R2 machines and there was still something left to do:
  1. Start -> run -> secpol.msc
  2. Local Policies -> Security Options -> Network Security: LAN Manager Authentication level
  3. Change to Send LM & NTLM - use NTLMv2 session security if negociated

The problem with SQL Server Agent

Although the package runs fine in BIDS I was not able to run the package from a job in SQL Server Agent. The package was not deployed to SQL Server.

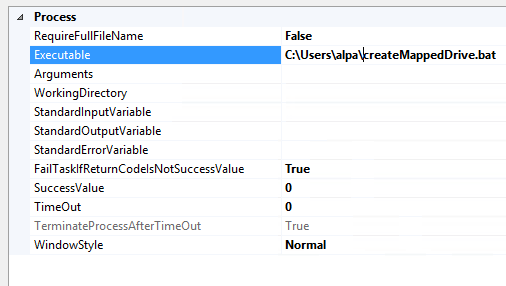
The only way I was able to run it from the Agent was to create a batch file (.bat) with the command "C:\Windows\System32\net.exe USE Z: \\192.168.1.10\sqlbackup /USER:username password" and change the Execute Process Task to run the batch file:


Monday, June 16, 2014

Short tutorial for NSLayoutConstraint

When I started developing Jano I was still creating my interfaces using the initWithFrame constructor. This approach was... painful :). So I started to search for other ways to create the interface. Of course, there was the option to use XIBs, but I did not want that. This is how I found the NSLayoutConstraint class.

In this post I will use the NSLayoutConstraint class to add a label to an UIViewController on a IOS app.

Setting things up

For this demonstration I will use the Achievements view controller in my app. This is where you can see the achievements that you get in the app, the badges, the points, etc.

I prefer to create the interface elements in a separate class so I that my ViewController remains as clean as possible. Here I have the AchivementsViewController and the AchievementsViewControllerInterfaceTool.

The AchievementsViewController.h is defined as follows:


#import <UIKit/UIKit.h> 

#import "AchievementsViewControllerInterfaceTool.h"


@interface AchievementsViewController : UIViewController <UITableViewDelegate, UITableViewDataSource> 


@property (nonatomic, strong) UILabel *lblTest;

@property (nonatomic, strong) UITableView *tableView;


@end


The AchievementsViewControllerInterfaceTool.h is defined as follows:

#import <Foundation/Foundation.h>

#import "AchievementsViewController"


@class AchievementsViewController;

@interface AchievementsViewControllerInterfaceTool : NSObject


@property (nonatomic, strong) AchievementsViewController* controller;


-(id)initWithController:(AchievementsViewController*)controller;

-(void)AddTestLabel;

-(void)AddTableView;


@end


Since both classes will reference one another (thus creating a circular dependency), in the interface tool I will add a forward declaration to the AchievementsViewController class: @class AchievementsViewController.

I will also add a table view using this class, but here I will show only how to add a UILabel to the view.

This is how AchievementsViewControllerInterfaceTool.m looks like:

#import "AchievementsViewControllerInterfaceTool.h"


@implementation AchievementsViewControllerInterfaceTool
@synthesize controller = _controller;

-(id)initWithController:(AchievementsViewController *)controller
{
       self = [super init];
       if (self) {

          _controller = controller;

       }
       return self;
}


-(void)AddTestLabel
{

_controller.lblTest = [[[UILabel alloc] init] autorelease];
_controller.lblTest.text = @"Achievements View Controller";
_controller.lblTest.translatesAutoresizingMaskIntoConstraints = NO;

[_controller.view addSubview:_controller.lblTest];
UILabel *lbl = _controller.lblTest;

NSArray * constraints = [NSLayoutConstraint constraintsWithVisualFormat:@"V:|-100-[lbl]" options:0 metrics:nil views:NSDictionaryOfVariableBindings(lbl)];


[_controller.view addConstraints:constraints];

NSLayoutConstraint *c1 = [NSLayoutConstraint constraintWithItem:lbl
                             attribute:NSLayoutAttributeCenterX
                             relatedBy:NSLayoutRelationEqual
                             toItem:lbl.superview
                             attribute:NSLayoutAttributeCenterX
                             multiplier:1
                             constant:0];


[_controller.view addConstraint:c1];

}

I have created a constructor that takes as parameter a reference to the AchievementsViewController and assigns it to our internal variable, _controller.

In the first part of the AddTestLabel method I instantiate the UILabel lblTest and set the property translatesAutoresizingMaskIntoConstraints to NO. For more information about this property you can check the official documentation here.

I then define UILabel *lbl = _controller.lblTest. This is because in the next statement I have to define the visual format for the NSLayoutConstraint: "V:|-100-[lbl]". This means that I will set the label 100 spaces from the top of the superview. The superview is marked by the "|" character.

In the next constraint (c1) I set the label at the center of the superview, on the X axis only.

Friday, June 6, 2014

Posting a form to get a file in return

I was working on an ASP.NET MVC application that, at some point, had to display the PDF version of an invoice. The file was stored on 3rd party's server and the only way you could get it was by posting a form. The form had to have an action (link) set and 2 inputs, one for the password and one for the username.

In order to achieve this, there are 2 possible solutions, but (in this case) only one (Solution 2) is the right solution.

So let's begin with the first solution.

Solution 1

First we write the html for the form:

    <form id="frmInvoice" method="post" target="_blank" >

        <input type="hidden" name="user" value="@Model.UserName" id="user" />

        <input type="hidden" name="pwd" value="@Model.Password" id="pwd" />

    </form>

Not so much to say here, just that the inputs for password and username are all hidden, meaning they will not appear in the web page.

Somewhere outside the form we create a button that will submit the form through a javascript function. We could have defined the button inside the form, but in this application it was not the case.

<input type="button" value="pdf" id="@Model.InvoiceNumber" onclick="postInvoiceForm(@Model.InvoiceNumber, '@Model.ActionLink');"  />


This button will call the javascript function below:

 function postInvoiceForm(invoiceNbr, actionLink) {

        var form = document.getElementById('frmInvoice');

        form.setAttribute('action', actionLink + invoiceNbr);

        form.submit();

    }


The 'action'  is the link where the form has to be posted, something like http://www.siteWithPdfs.com/pdfid. In order for the javascript function to work I had to put the value inside single quotes.

Problem

The problem with this approach is that the username and password are visible in the page if you look at the source. This is the reason I had to go with the second option.You could use this solution if you did not have any user and password, since it would be the fastest to implement.


Solution 2

Use WebRequest instead.

In the view change the button with:

<a href="@Url.Action("GetInvoicePDF", "MyController", new { invoiceNumber = Model.InvoiceNumber })" target = "_blank">

          <img src="@Url.Content("~/Content/images/filetype_pdf.png")" alt="pdf" />

 </a>

The target = _blank is set so that I get the pdf in a new tab (or window) and I don't loose the page I was coming from.

In the MyController controller, create the method GetInvoicePDF:

public ActionResult GetInvoicePDF (string invoiceNumber)

{

   WebRequest request = WebRequest.Create("www.siteWithPdfs.com");

   request.Method = "POST";

   request.ContentType = "application/x-www-form-urlencoded";


   Encoding iso8859_1 = Encoding.GetEncoding("iso-8859-1");

   StreamWriter sw = new StreamWriter(request.GetRequestStream(), iso8859_1);

   sw.Write("User=");

   sw.Write(HttpUtility.UrlEncode(Model.UserName, iso8859_1));

   sw.Write("Pwd=");

   sw.Write(HttpUtility.UrlEncode(Model.Password, iso8859_1));

   sw.Close();


Stream fs = request .GetResponse().GetResponseStream();

var fsResult = new FileStreamResult(fs, "application/pdf");

return fsResult;

}


The method creates a WebRequest object that will be used to post the form. The encoding was used only because I had to prepare for nordic characters.


Wednesday, June 4, 2014

Truncating table on Linked server

I was trying to truncate a table from a linked server with a command like:
Truncate table [Linked_Server].[Database].[Schema].[TableName], but I was getting an error stating: "The object name [Linked_Server].[Database].[Schema].[TableName] contains more than the maximum number of prefixes. The maximum is 2."

The fix for his was to run the sql through sp_executesql stored procedure on the Linked server:

EXEC [Linked_Server].[Database].sys.sp_executesql N'Truncate table dbo.MyTable'

Monday, June 2, 2014

Importing data from one sqlite database to another


After some problems with Jano, a core data application for IOS, I had to take the data from an older database and put it in a new file. For this I started the Terminal application and typed sqlite, then hit Enter.

The first thing to do was to attach the 2 databases using the following command:

attach database "/Users/puiu/Documents/Jano.sqlite" as 'jano';
attach database "/Users/puiu/Documents/JanoNew.sqlite" as 'janonew';

Inserting the data was quite easy, using a simple SQL statement:

insert into janonew.zcounters(z_ent, z_opt, zisspecial, zordinal,zparent,zhiragana,zkanji,zromaji) 
select z_ent, z_opt, zisspecial, zordinal,zparent,zhiragana,zkanji,zromaji from jano.zcounters;

Tuesday, May 13, 2014

Setting page name in report

One of the advantages of using Reporting Services with SQL Server 2008 R2 or later is that you can get sheet names for Excel when exporting.
In my case I needed to export an excel file with different companies' names on the sheet name.

For this you first need to create a row group on the field you need. Then go to Row Groups, select the group like in the picture below:

Go to the properties of that group. You should see something like this:

Set the BreakLocation as you need it and the field name for the PageName.

Run your report and export it to excel. The sheet names will no longer be Sheet1, Sheet2, etc.


Wednesday, October 16, 2013

IIS error - Request entity too large


I had been working on a WCF web service lately that received the contents of a file as byte array and saved it in a database.

When calling the web-service I received the error "Request entity too large." Although the file was less than 200kb it was not able to process it.

The solution was to put the following tags inside the <system.serviceModel> tag in web.config.

<system.serviceModel>
                <bindings>
<basicHttpBinding>
<binding maxReceivedMessageSize="2097152"></binding>
</basicHttpBinding>
</bindings>
  </system.serviceModel>